Creating screen recordings on macOS doesn’t have to be difficult, time consuming or expensive. You may be surprised to learn that pre-installed applications and tools in macOS can be used to quickly create high quality screen recordings and animated screenshots of your Mac, iPhone and iPad.
QuickTime Player, which ships with macOS out of the box, includes built-in screen recording functionality. If you’re looking to create and share a short screen capture that does not require advanced video editing, QuickTime is an ideal solution. (You can even make screen recordings of a connected iPhone or iPad!)
While macOS provides keyboard shortcuts for taking screenshots of the entire screen ( ⌘ ⇧ 3 ), a portion of the screen ( ⌘ ⇧ 4 ), and a single window ( ⌘ ⇧ 4 spacebar ), there is no keyboard shortcut for recording a window.
Pressing ⌘ ⇧ 5 opens the Screenshot app which provides a convenient UI for taking a screenshot or screen recording of the entire screen, a single window, or a portion of the screen (though I’ve noticed that—on my machine—there is no option to record a single window).
You can also create a screen recording by opening QuickTime Player, and selecting File > New Screen Recording or using the ⌘ ⇧ N keyboard shortcut.
Automating Screen Recording
I frequently create screen recordings, so I have written the following shell function to quickly initiate a new recording using QuickTime:
##
# Create a new screen recording of the frontmost window of  an application
# Note: Assistive access must be enabled for "automated start" to work
##
function rec {
  # Capture arguments
  while getopts "Aa:D:p:i:" opt
  do
    case $opt in
      (A) local audio=1  ;;             # Capture audio
      (D) local display=$OPTARG  ;;     # Capture an entire display (by index)
      (a) local process=$OPTARG  ;;     # Capture an Application's window
      (p) local padding=$OPTARG  ;;     # (Optionally) Set padding around captured window
      (i) local windowIndex=$OPTARG  ;; # (Optionally) Set captured window's index
    esac
  done
  shift $(( OPTIND - 1 ))

  # Require exactly one of display or process
  if [[ -n $display && -n $process ]]; then
    echo "Error: cannot specify both -D (display) and -a (process)" >&2
    return 1
  elif [[ -z $display && -z $process ]]; then
    echo "Error: must specify either -D (display) or -a (process)" >&2
    return 1
  fi

  # Enable 'Do Not Disturb' Focus more before recording
  # Requires 'dnd' shortcut to be installed
  shortcuts run dnd <<< "on"
  trap 'shortcuts run dnd <<< "off"' EXIT

  # Build argument array
  local -a args=(-p -k -v)
  (( audio )) && args+=(-g)
  [[ -n $display ]] && args+=("-D$display")

  # Get bounds of application window
  # Requires 'window-bounds' AppleScript to be installed
  if [[ -n $process ]]; then
    local wbArgs=()
    [[ -n $windowIndex ]] && wbArgs+=("-i" "$windowIndex")
    read x y dx dy <<< "$(window-bounds get "$process" "${wbArgs[@]}")"
    args+=(-R "$((x-padding)),$((y-padding)),$((dx+2*padding)),$((dy+2*padding))")
  fi
  screencapture "${args[@]}"
}
Tip: This script uses the native screencapture command line tool. Because of this, the active screen recording may only be stopped by interrupting the command line using the
⌃
C
keyboard shortcut.
Dependencies
The script above has a few dependencies which should be installed in order to unlock the script’s full potential.
Do Not Disturb
In most cases, you do not want notifications to appear while screen recording; to prevent these interruptions, you can enable the “Do Not Disturb” Focus mode.
The script utilizes the Shortcut below to control macOS’s “Do Not Disturb” Focus mode from the command line.
Get/Set Window Bounds
The main purpose of the script is to allow you to easily record a single window. The script achieves this by recording a portion of the screen.
The script utilizes an Applescript which allows you to control (get and set) window bounds from the command line. This is used to automatically select the portion of the screen matching the application’s window bounds.
QuickTime Player Default Settings
The QuickTime screen recorder has options that can be set both through the GUI and on the command line.
# Set recording quality
# High:    MGCompressionPresetHighQuality
# Maximum: MGCompressionPresetMaximumQuality
defaults write com.apple.QuickTimePlayerX MGRecordingCompressionPresetIdentifier -string 'MGCompressionPresetMaximumQuality'

# Show mouse clicks in screen recordings
defaults write com.apple.QuickTimePlayerX MGScreenRecordingDocumentShowMouseClicksUserDefaultsKey -bool true
QuickTime provides some very basic, easy-to-use video editing functions like trimming and clipping. Unfortunately, more advanced functions like changing the video dimensions and speed are not available, and QuickTime can only export videos in predefined formats (which are not optimized for sharing).
Optimizing Screen Recordings with Automator
It is possible to automagically optimize screen recordings for sharing by using an Automator workflow. Automator, another application that ships with macOS by default, is a very powerful tool that allows you to easily automate actions on your machine.
To run a script automatically whenever a new file is added to a particular folder, use Automator to create a new Folder Action. Once you’ve opened a new Folder Action, select a folder where you will save your video files to (I use ~/Movies/). In the Library panel locate the Filter Finder Items action (found within the Files & Folders actions), and drag-and-drop the action into the workflow. You now have the ability to filter out files that you do not wish to optimize. I filter by files created today, of type movie, with a mov file extension. Next, locate the Run Shell Script action (found within the Utilities actions), ensure input is passed as arguments, and in the body of the action, call the automated script you wish to run on the files.
The following script uses gifv to create an optimized video file that is half the resolution and 2.5× faster than the original video. This can significantly reduce file size, and make the video file easier to share.
source $HOME/.exports
export PATH=$PATH:/usr/local/bin:/usr/local/var/rbenv/shims

# Optimize videos at double speed and half resolution
# Minimum resolution
min_res=480
gifv -p "trunc(max(min($min_res\,iw)\,iw/2)/2)*2:-2" -s 2.5 "$1"
Dependencies
gifv
gifv is a command-line wrapper around ffmpeg that converts video files and GIFs into videos optimized for GIF-like playback on the web.
The gifv tool was based on two “competing formats”, imgur’s GIFV and gfycat’s GFY (both pronounced “jiffy”). Essentially, these “formats” are wrappers around compressed video files (h.264 encoded MP4s or WebMs).
Whenever possible, video files should be preferred to GIFs, as video codecs offer superior compression, which results in smaller filesizes, better quality, and includes built-in playback controls.
Installation
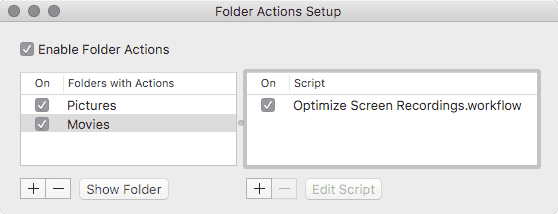
Install gifv, add the script above to your ~/bin/ directory and install the Automator Folder Action workflow below by downloading it and moving it to ~/Library/Workflows/Applications/Folder Actions. Once you have the Folder Action in place, you must enable Folder Actions and assign the action to a folder. To do this, open the Folder Actions Setup app, check the box next to “Enable Folder Actions”, add a folder you wish to apply the action to (I chose the user’s Movies folder), and add the script as seen in the screenshot below.
All videos created by QuickTime, saved to ~/Movies/ will be automatically optimized.
Other Tools
gifify
Some services do not allow video files to be used, but do accept animated GIFs. In these cases, you can use gifify to convert the video file to an animated GIF.
The version of gifify linked above if a fork of Jonathan Clem’s gifify which provides some additional options such as reversed and parametric (or patrol) playback, as well as a number of different options for quality and compression/generation speed.
Another option is to use the node package of the same name, which offers even more options.